Technical Page |
12v DC Regulator |

Handy Circuit Diagrams |
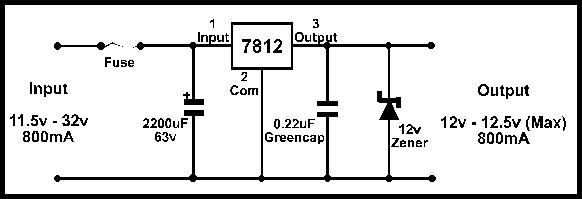
Almost all CCD cameras require a regulated 12v DC power supply to operate properly. Most of these supplies cost in excess of $25. This circuit is very cheap and easy
to make, and will convert any 11.5 to 32 volt power adapter into a clean 12 volt
regulated supply; now you can put those spare power adapters to work. Other circuit features include: Large 2200uF electro Cap provides smooth ripple free, filtered voltage, and decouples the power adapter for when multiple cameras use it as a common power supply. Zener Diode and fuse protection Fuse Specifications 1 Camera, use @200mA fuse 2 Cameras, use @315mA fuse 3 Cameras, use @500mA fuse 4 Cameras, use @1 Amp fuse |
Page still under construction. More to come!! |
1 KM Bug |
Video Switcher |
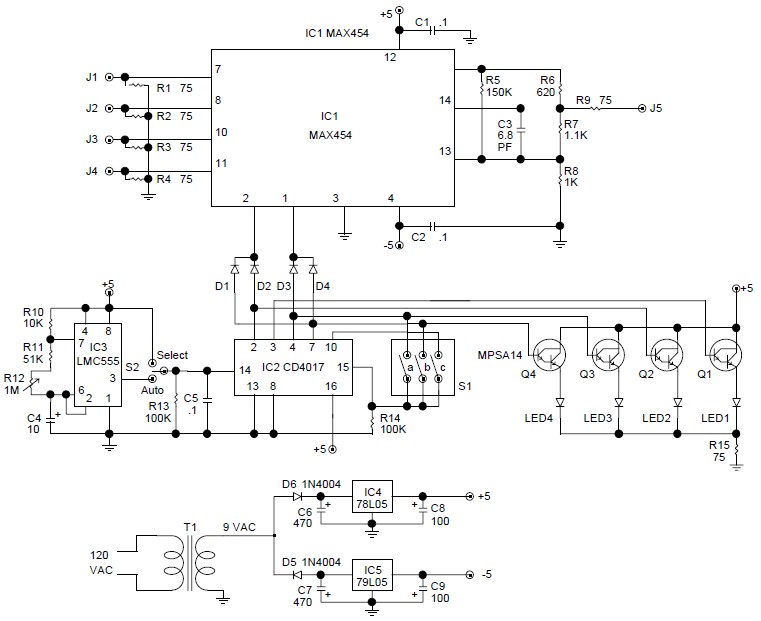
This circuit is a video switcher for input channels which connected to the cameras.
The heart from the video switcher is really a Maxim MAX454. That integrated
circuit includes a four-way video multiplexer and an amplifier that operates as
a low-impedance line driver. The resulting video output is high quality with really
low phase distortion. The video inputs are selected by applying a binary
number to the address inputs. The binary number can also be put to use to light a series of LEDs that indicate which camera
input is presently chosen. The circuit is powered by a 9-volt AC wall-adapter
transformer, two diodes, and two voltage regulators Parts List: RESISTORS (all resistors are 1/8 watt, 5% units unless otherwise noted) R1-R4, R9-R15 75 ohm R5 150,000 ohm R6 620 ohm R7 1100 ohm R8 1000 ohm R10 10,000 ohm R11 51,000 ohm R12 I megohm potentiometer, panel mount R13, R14 100,000 ohm CAPACITORS C1,C2,C5 0.1 mF, 50 WVDC, metalized film C3 6.8 pF, ceramic disc C4 10 mF, 50 WVDC, low leakage electrolytic C5, C7 470 mF, 25 WVDC, electrolytic C8, C9 100 mF, 16 WVDC, electrolytic Source http://wiringschematics.net/ |
Video In |
Video Out |
PSU |
SEMICONDUCTORS IC1 MAX454 multiplexer, integrated circuit (MAXIM) IC2 CD4017 decade counter, integrated circuit IC3 LMC555 timer, integrated circuit IC4 78l05 voltage regulator, integrated circuit IC5 79l05 voltage regulator, integrated circuit Q1-Q4 MPSA14, NPN transistor D1-D4 1N914, silicon diode D5, D6 1N4004, silicon diode LED1-LED4 Light emitting diode, red ADDITIONAL PARTS AND MATERIALS S1 DIP switch, 3 position S2 Toggle switch, single pole double throw, one momentary position (Digi-Key CK1028-ND or similar) J1-J5 Video connector, chassis mount, F type T1 9 volt AC wall adapter transformer PC board, IC sockets, LED holders, 22 gauge hookup wire, knob, enclosure, hardware, etc. |
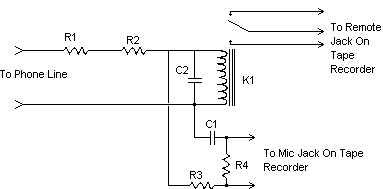
This is a very simple phone tap circuit diagram which is built just with a few components.
You just need to connect this circuit to any home telephone line and
start to record the conversation from the phone line where thic circuit is connected
to. NOTE. Not ACMA compliant...Build this circuit at your own risk. Parts List: R1 = 470 Ohm R2 = 1K Ohm R3 = 100K Ohm R4 = 6K Ohm C1, C2 = 0.01uF K1 = 24VDC Reed Relay MISC = Wire, Headphone Plugs, Phone Plug Or Alligator Clips Circuit Notes: To work with the circuit, just connect it in series towards the home phone. Then plug in the recorder. It is going to begin recording once the home phone is picked up. The values of R1 and R2 may possibly need to be fine-tuned, dependent on the characteristics of your home phone line it is connected to (they vary). In the event the R1+R2 combination is increased sufficiently (try 2.47K) then the circuit can be joined in parallel with the line, thus covering all attached devices. If you drop the resistors and give a 2.2uF capacitor the line is not going to stay off hook. It blocks the DC from the moniter position Source http://www.aaroncake.net/circuits/phonetap.asp |
Phone Tap |
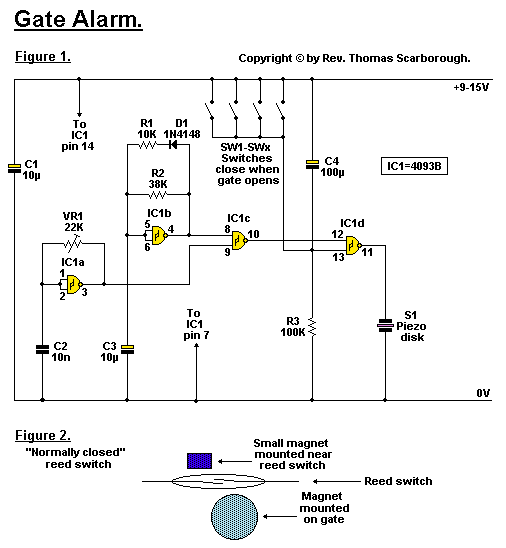
Gate Alarm |
Above alarm is a simple gate alarm circuit based on IC 4093B. IC1a is a fast oscillator, and IC1b a slow oscillator, which are combined through IC1c to emit a high pip-pip-pip warning sound when a gate (or window, etc.) is opened. The circuit is intended not so much to sound like a siren or warning device, but rather to give the impression: You have been noticed. R1 and D1 may be omitted, and the value of R2 perhaps reduced, to make the Gate Alarm sound more like a warning device. VR1 adjusts the frequency of the sound emitted. IC1d is a timer which causes the Gate Alarm to emit some 20 to 30 further pips after the gate has been closed again, before it falls silent, as if to say: Im more clever than a simple on-off device. Piezo disk S1 may be replaced with a LED if desired, the LED being wired in series with a 1K resistor. Please check the figure 2 about how to install the reed switch. You may using other types of switch, your creativity is absolutely important to get best result in switch installation. Source: http://www.zen22142.zen.co.uk/Circuits/Alarm/Galarm.html |